This is an old revision of the document!
Table of Contents
Installing OpenWRT on the router for the first time
Go to the OpenWRT firmware selector. Select your device. Download the “factory” firmware and install it to your router as described on the device's OpenWRT wiki page. (e.g. https://openwrt.org/toh/ubiquiti/edgerouter_x_er-x_ka)
Generating the funkfeuer firmware image
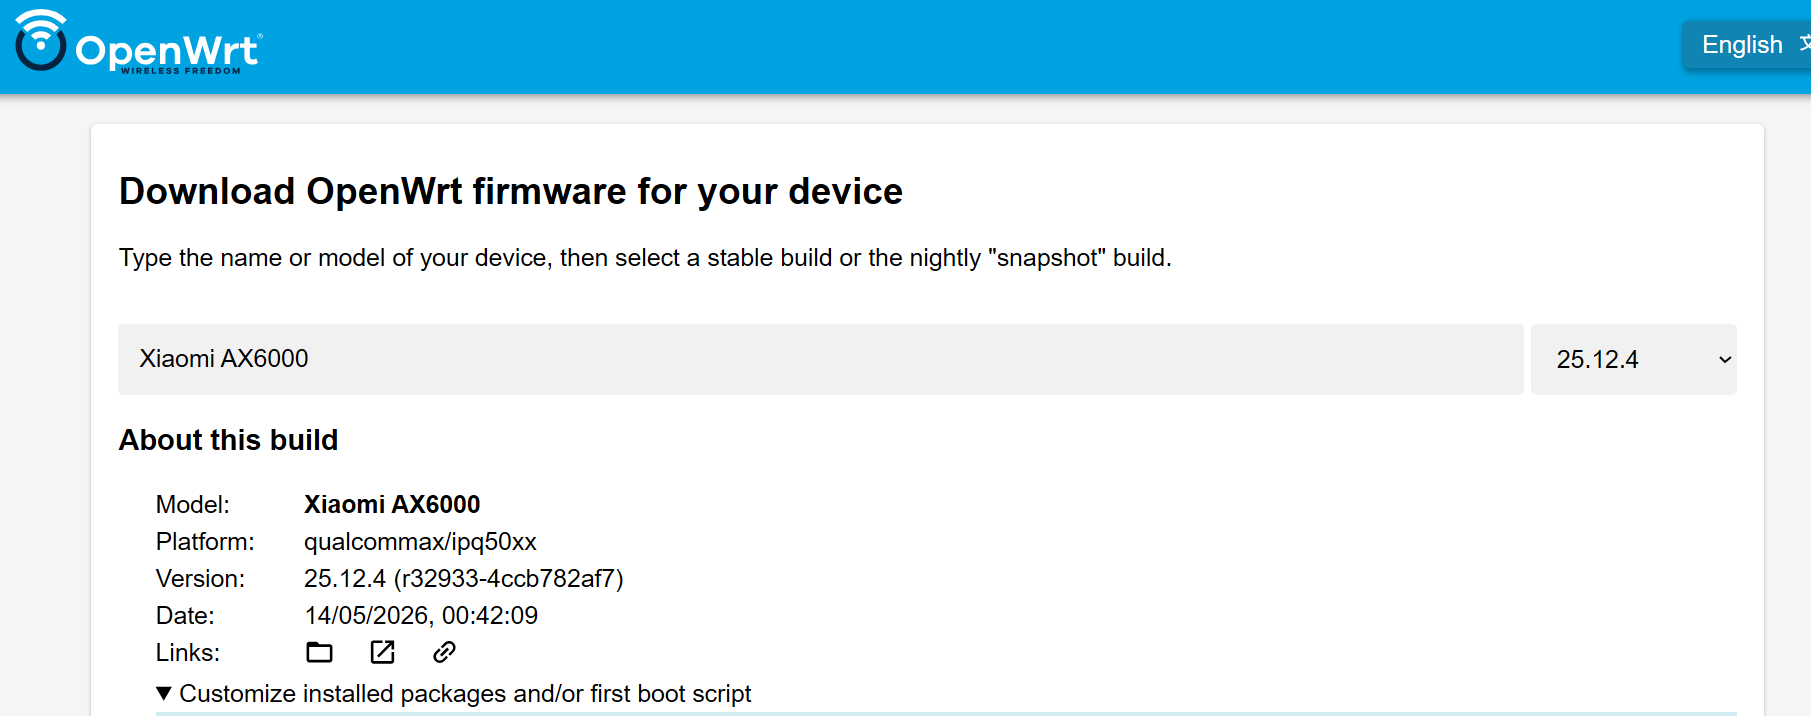
- Go to the OpenWRT firmware selector.
- Select your device.
- Click on “Customize installed packages and/or first boot script”.
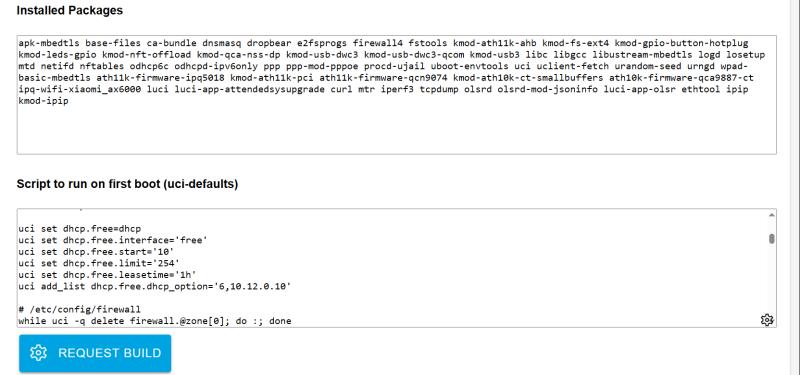
- Add the following packages to the list
curl mtr iperf3 tcpdump olsrd olsrd-mod-jsoninfo luci-app-olsr ethtool ipip kmod-ipip
- Copy the following script and paste it to “Script to run on first boot (uci-defaults)” on the image builder website
- Replace xxx in the first line with your location's name
- (optional) change LAN_IP and LAN_NET
The script contains some default values that make configuration easier.
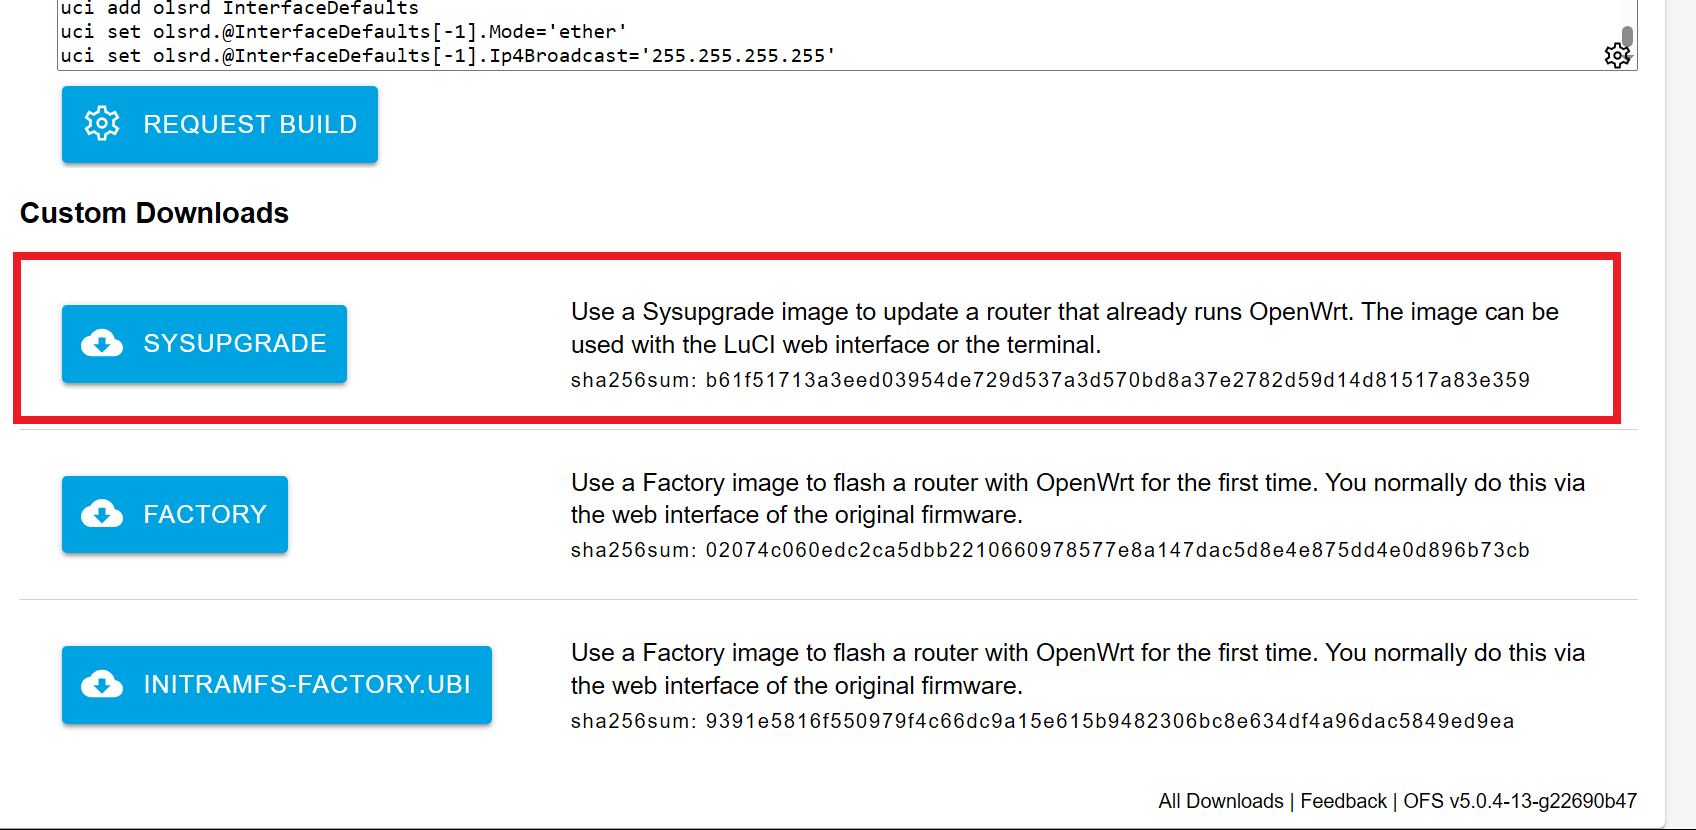
#openwrt config script for funkfeuer graz
#written by gabor
export FF_HOSTNAME="xxx.graz.funkfeuer.at"
export LAN_IP="192.168.10.1/24"
export LAN_NET="192.168.10.0/24"

#check if already configured. prevents overwriting settings when upgrading openwrt
[ "$(uci -q get system.@system[0].hostname)" = "$FF_HOSTNAME" ] && exit 0

#disable olsrd6 (not used in ffgraz)
/etc/init.d/olsrd6 stop
/etc/init.d/olsrd6 disable

# /etc/config/dhcp
uci del dhcp.@dnsmasq[0].server
uci del dhcp.@dnsmasq[0].address
uci del dhcp.@dnsmasq[0].filterwin2k
uci del dhcp.@dnsmasq[0].nonegcache
uci del dhcp.@dnsmasq[0].nonwildcard
uci del dhcp.@dnsmasq[0].filter_aaaa
uci del dhcp.@dnsmasq[0].filter_a

#set dns resolver to 10.12.0.10
uci add_list dhcp.@dnsmasq[0].server='10.12.0.10'

#enable reverse dns lookup for 10.12.xxx.xxx addresses
uci add_list dhcp.@dnsmasq[0].address='/.12.10.in-addr.arpa/10.12.0.10'
uci set dhcp.@dnsmasq[0].boguspriv='0'

uci del dhcp.free

uci set dhcp.free=dhcp
uci set dhcp.free.interface='free'
uci set dhcp.free.start='10'
uci set dhcp.free.limit='254'
uci set dhcp.free.leasetime='1h'
uci add_list dhcp.free.dhcp_option='6,10.12.0.10'

# /etc/config/firewall
while uci -q delete firewall.@zone[0]; do :; done
while uci -q delete firewall.@forwarding[0]; do :; done
while uci -q delete firewall.@nat[0]; do :; done
while uci -q delete firewall.@rule[0]; do :; done
uci set firewall.cfg01e63d.synflood_protect='1'
uci add firewall zone # =cfg0edc81
uci set firewall.@zone[-1].name='ff'
uci set firewall.@zone[-1].input='DROP'
uci set firewall.@zone[-1].output='ACCEPT'
uci set firewall.@zone[-1].forward='ACCEPT'
uci add_list firewall.@zone[-1].network='ffeth'
uci add_list firewall.@zone[-1].network='ffwifimesh'

uci add firewall zone
uci set firewall.@zone[-1].name='lan'
uci set firewall.@zone[-1].input='ACCEPT'
uci set firewall.@zone[-1].output='ACCEPT'
uci set firewall.@zone[-1].forward='DROP'
uci add_list firewall.@zone[-1].network='lan'

uci add firewall rule # =cfg0f92bd
uci set firewall.@rule[-1].name='ssh'
uci add_list firewall.@rule[-1].proto='tcp'
uci set firewall.@rule[-1].src='ff'
uci set firewall.@rule[-1].dest_port='22'
uci set firewall.@rule[-1].target='ACCEPT'
uci set firewall.@rule[-1].name='ssh ff'

uci add firewall rule # =cfg1092bd
uci set firewall.@rule[-1].name='olsrd'
uci add_list firewall.@rule[-1].proto='udp'
uci set firewall.@rule[-1].src='ff'
uci set firewall.@rule[-1].dest_port='698'
uci set firewall.@rule[-1].target='ACCEPT'
uci set firewall.@rule[-1].name='olsrd ff'

uci add firewall zone # =cfg11dc81
uci set firewall.@zone[-1].name='free'
uci set firewall.@zone[-1].input='DROP'
uci set firewall.@zone[-1].output='ACCEPT'
uci set firewall.@zone[-1].forward='DROP'
uci add_list firewall.@zone[-1].network='free'

uci add firewall forwarding # =cfg13ad58
uci set firewall.@forwarding[-1].src='lan'
uci set firewall.@forwarding[-1].dest='ff'

uci add firewall forwarding # =cfg12ad58
uci set firewall.@forwarding[-1].src='free'
uci set firewall.@forwarding[-1].dest='ff'

uci add firewall nat # =cfg1393c8
uci set firewall.@nat[-1].name='nat free wifi to ff'
uci add_list firewall.@nat[-1].proto='all'
uci set firewall.@nat[-1].src='ff'
uci set firewall.@nat[-1].src_ip='10.14.0.0/24'
uci set firewall.@nat[-1].target='MASQUERADE'

uci add firewall nat # =cfg1393c8
uci set firewall.@nat[-1].name='nat lan to ff'
uci add_list firewall.@nat[-1].proto='all'
uci set firewall.@nat[-1].src='ff'
uci set firewall.@nat[-1].src_ip="$LAN_NET"
uci set firewall.@nat[-1].target='MASQUERADE'

uci add firewall rule # =cfg1492bd
uci set firewall.@rule[-1].name='web'
uci add_list firewall.@rule[-1].proto='tcp'
uci set firewall.@rule[-1].src='ff'
uci set firewall.@rule[-1].dest_port='80'
uci set firewall.@rule[-1].target='ACCEPT'
uci set firewall.@rule[-1].name='web ff'


uci add firewall rule # =cfg1592bd
uci set firewall.@rule[-1].name='ssh free'
uci add_list firewall.@rule[-1].proto='tcp'
uci set firewall.@rule[-1].src='free'
uci set firewall.@rule[-1].dest_port='22'
uci set firewall.@rule[-1].target='ACCEPT'


uci add firewall rule # =cfg1692bd
uci set firewall.@rule[-1].name='icmp ff'
uci add_list firewall.@rule[-1].proto='icmp'
uci set firewall.@rule[-1].src='ff'
uci set firewall.@rule[-1].target='ACCEPT'

uci add firewall rule # =cfg1792bd
uci set firewall.@rule[-1].name='icmp free'
uci add_list firewall.@rule[-1].proto='icmp'
uci set firewall.@rule[-1].src='free'
uci set firewall.@rule[-1].target='ACCEPT'

uci add firewall rule # =cfg0c92bd
uci set firewall.@rule[-1].name='dhcp free'
uci add_list firewall.@rule[-1].proto='udp'
uci set firewall.@rule[-1].src='free'
uci set firewall.@rule[-1].src_port='68'
uci set firewall.@rule[-1].dest_port='67'
uci set firewall.@rule[-1].target='ACCEPT'

# /etc/config/network
uci del network.wan
uci del network.wan6

uci del network.lan.netmask
uci del network.lan.ipaddr
uci add_list network.lan.ipaddr="$LAN_IP"

uci del network.globals.ula_prefix
uci set network.globals.packet_steering='1'

uci add network device # =cfg080f15
uci set network.@device[-1].type='bridge'
uci set network.@device[-1].name='br-free'
uci set network.@device[-1].bridge_empty='1'

uci del network.free
uci set network.free=interface
uci set network.free.device='br-free'
uci set network.free.proto='static'
uci add_list network.free.ipaddr='10.14.0.1/24'

# /etc/config/wireless
i=0
while uci -q get "wireless.radio$i"
do
 uci set wireless.wifinetfree$i=wifi-iface
 uci set wireless.wifinetfree$i.device=radio$i
 uci set wireless.wifinetfree$i.mode='ap'
 uci set wireless.wifinetfree$i.ssid='Free WiFi - graz.funkfeuer.at'
 uci set wireless.wifinetfree$i.encryption='none'
 uci set wireless.wifinetfree$i.network='free'
 uci set wireless.wifinetfree$i.disabled='1'
 i=$(( $i + 1 ))
done

# /etc/config/system
uci del system.ntp.enabled
uci del system.ntp.enable_server
uci set system.cfg01e48a.hostname=$FF_HOSTNAME
uci set system.cfg01e48a.zonename='Europe/Vienna'
uci set system.cfg01e48a.timezone='CET-1CEST,M3.5.0,M10.5.0/3'
uci set system.cfg01e48a.log_proto='udp'
uci set system.cfg01e48a.conloglevel='8'
uci set system.cfg01e48a.cronloglevel='5'
# /etc/config/wireless

while uci -q delete olsrd.@Interface[0]; do :; done

uci set olsrd.@LoadPlugin[-1].ignore='0'
uci set olsrd.@LoadPlugin[-1].library='olsrd_jsoninfo'

while uci -q delete olsrd.@InterfaceDefaults[0]; do :; done
uci add olsrd InterfaceDefaults
uci set olsrd.@InterfaceDefaults[-1].Mode='ether'
uci set olsrd.@InterfaceDefaults[-1].Ip4Broadcast='255.255.255.255'
- Example:

- Click on “Request Build” and wait for the build to complete.
- Download the newly built custom sysupgrade image
- Log in to your router using the web interface (http://192.168.1.1)
- Go to “System→Backup/Flash Firmware”
- Click on “Flash image” and select your newly downloaded sysupgrade image.
- Untick the box “Keep settings and retain the current configuration”
- Click “Continue”
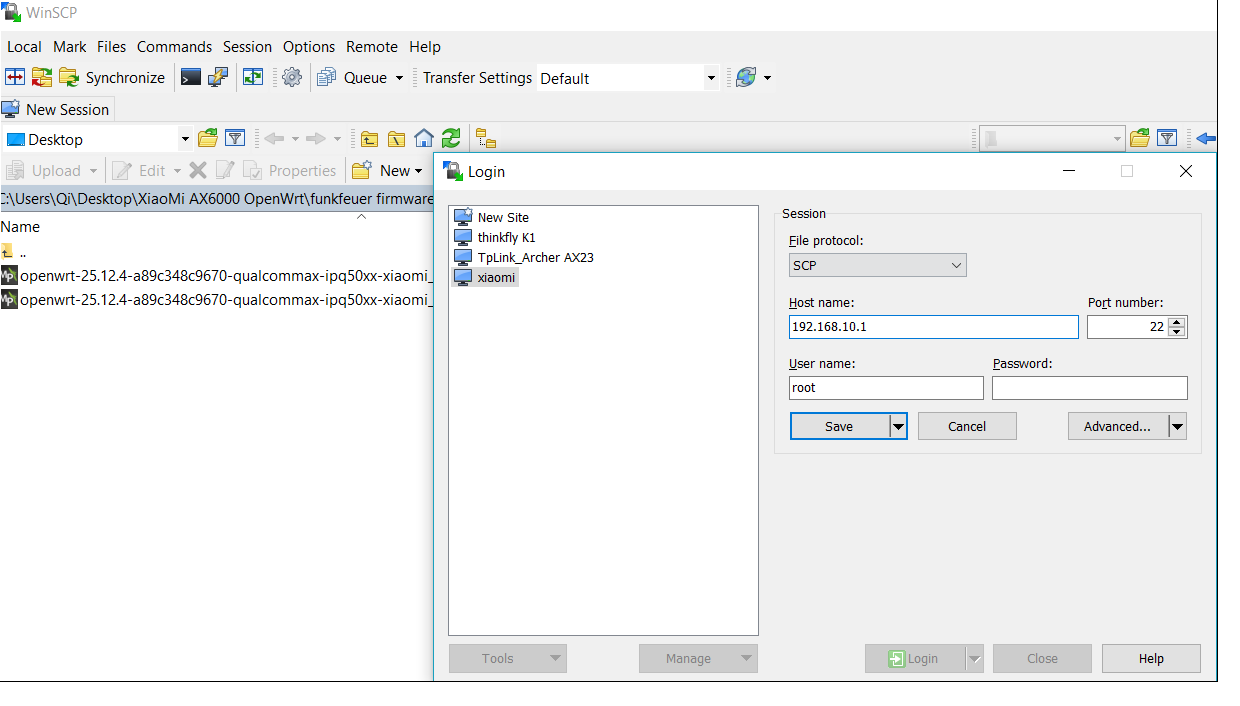
- Note: if you can't log into the web interface, you can use “WinSCP” to upload the firmware
- upload the firmware 'openwrt-25.12.4-a89c348c9670-qualcommax-ipq50xx-xiaomi_ax6000-squashfs-sysupgrade.bin' to /tmp folder
- SSH to the router (e.g., Putty)
- Flash the firmware with the following command
sysupgrade -n -v /tmp/openwrt-25.12.4-a89c348c9670-qualcommax-ipq50xx-xiaomi_ax6000-squashfs-sysupgrade.bin
- Once flashing finished, you can log into the web interface (http://192.168.10.1)
Accessing the router
After the installation has completed the router should be reachable by connecting to its LAN port using the configured LAN_IP (192.168.10.1 as default). The web interface can be accessed using a browser, e.g. at http://192.168.10.1/. The web interface redirects to the olsr status page by default e.g. to http://192.168.10.1/cgi-bin/luci/. In order to access the admin interface, admin has to be appended to the URL: http://192.168.10.1/cgi-bin/luci/admin
The default password is empty
Configuring a new interface
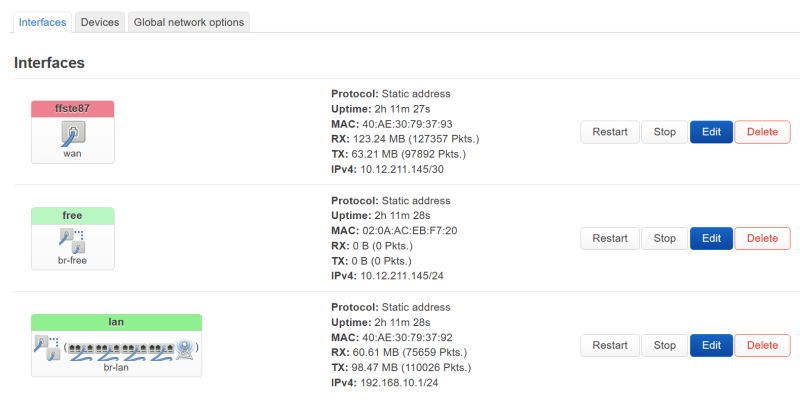
- Click on 'Network→Interfaces'
- Add a new Network
- Name: The name of the remote location [any name, for example 'ffste87']
- Protocol: Static address
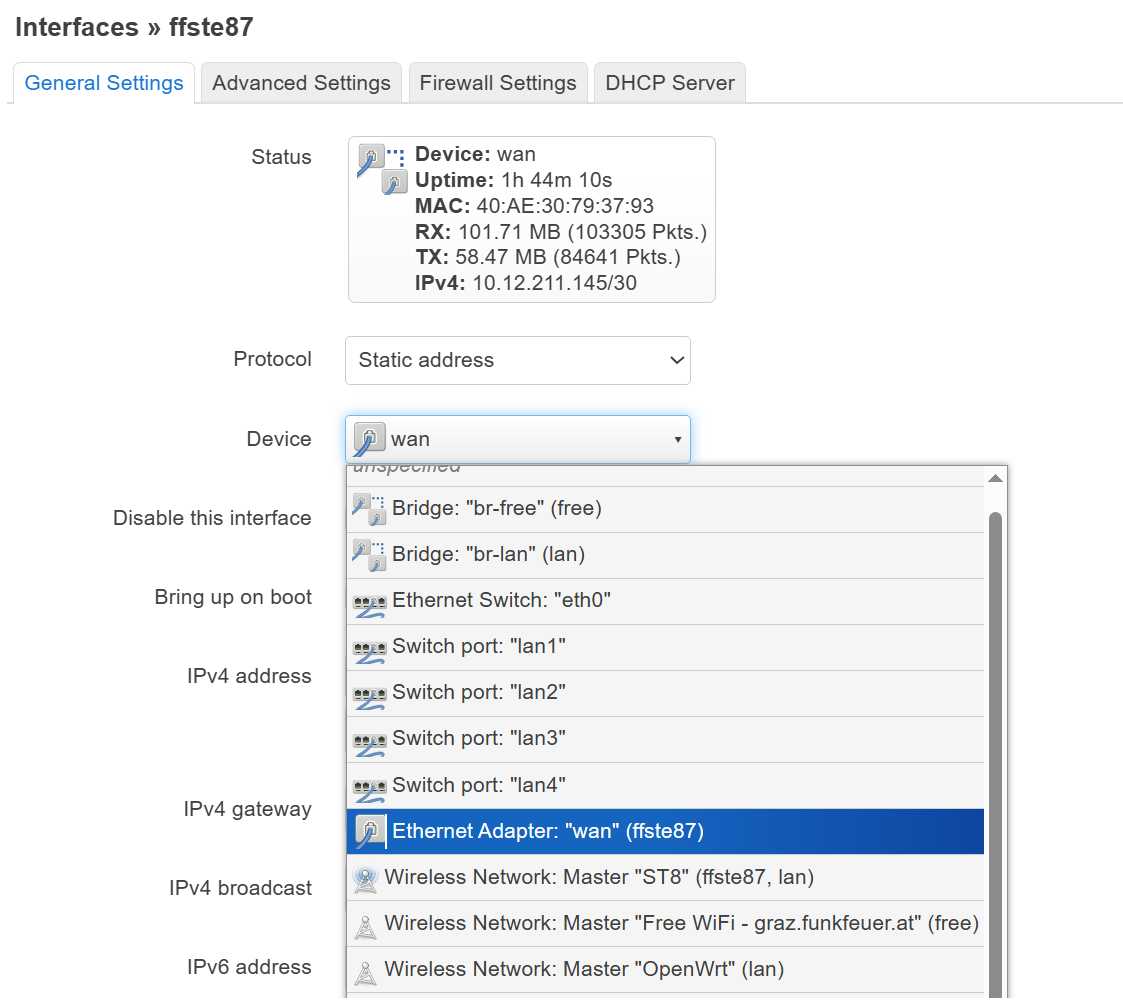
- Device: choose the port you want to use for the new connection
- Ethernet Adapter“wan” (ffste87“) [this is the port you connect to the antenna]
- Set the IP address according to the Manman database
- for example:
- IP: 10.12.xxx.145
- Netmask: 255.255.255.252
- at the IpV4 address, input “10.12.xxx.145/30” [/30 is the netmask .252]
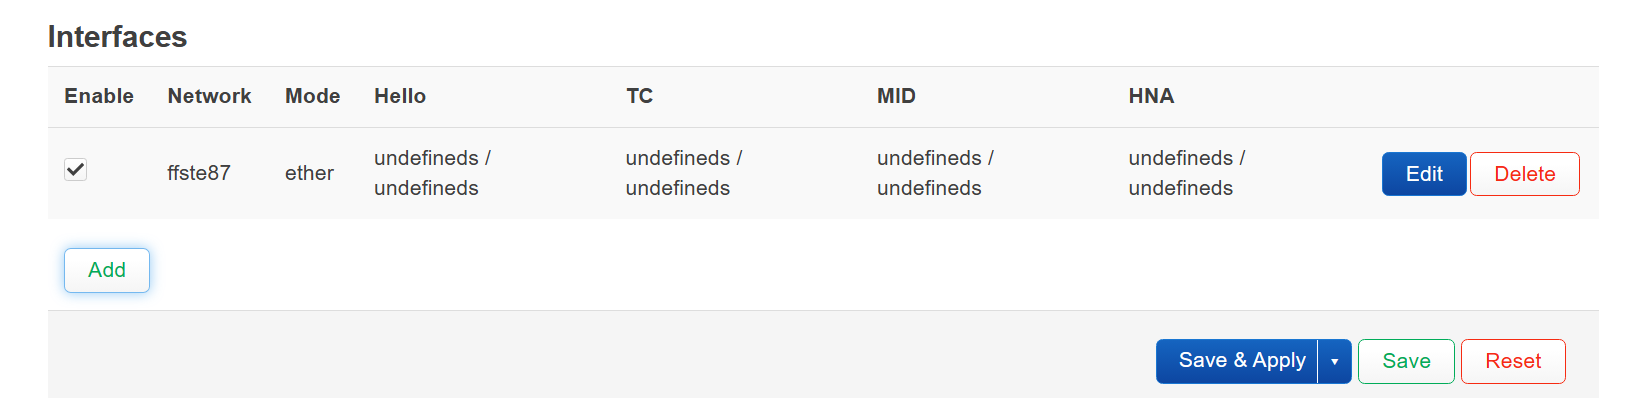
- Click on 'Services→OLSR IPv4'
- Add a new interface
- Set
Networkto the network added in the previous step- in this example, the network is “ffste87”
- Click Save
- Go to the tab HNA Announcements [Services→OLSR IPv4→HNA Announcements]
- Add a new announcement
- Set the network address and netmask according to the network in Manman https://manman.ffgraz.net/
- Network address: 10.12.xxx.144 [note! not 145, but 144]
- Netmask: 255.255.255.252
- Click Save and Apply
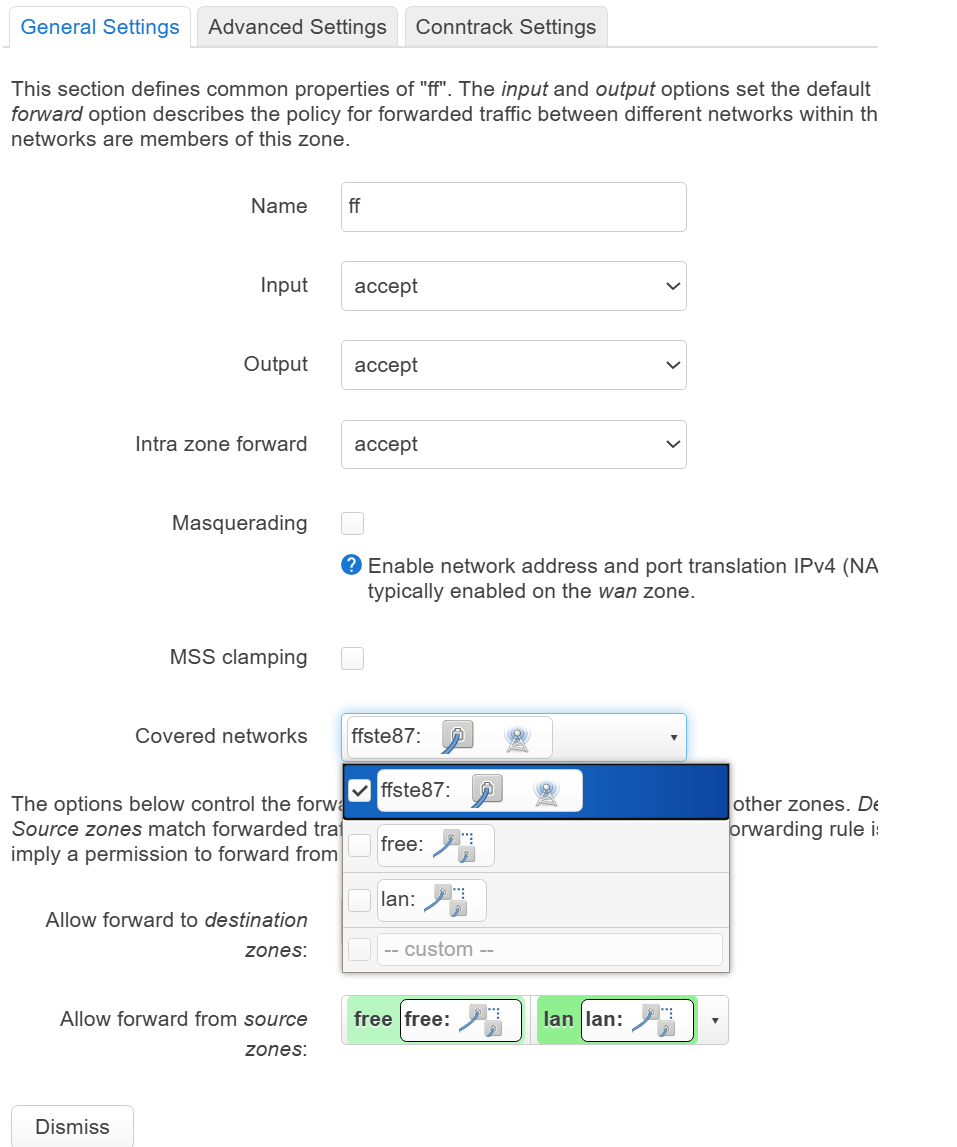
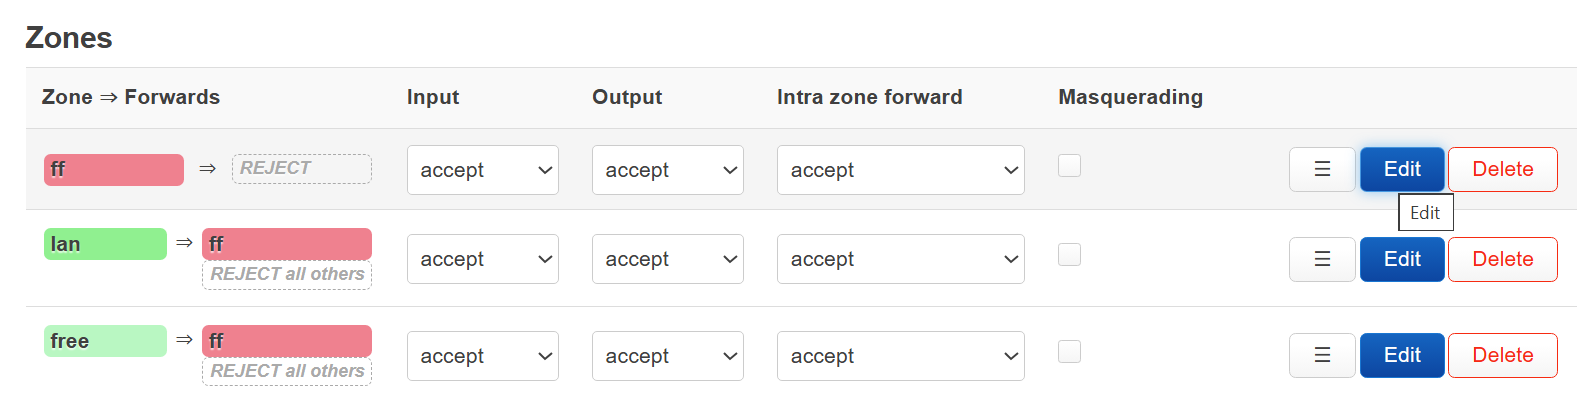
- Go to 'Network → Firewall'
- click 'Edit' at the 1st row “ff”
- General setttings → covered networks → select “ffste87” [the network name you set before]
- Allow forwad from source zones: free, lan
- Click 'save and apply'
- make sure all the input|output|forward is 'accept'
- If everything setup correctly, open
http://192.168.10.1/cgi-bin/luci/, you shall see it like this


TODO: add interfaces for olsrd, setup olsrd, setup wifi, setup free wifi
Setup OLSRD & Add Interfaces for OLSRD
- Open software “WinSCP”, connect to the router [192.168.10.1] by scp
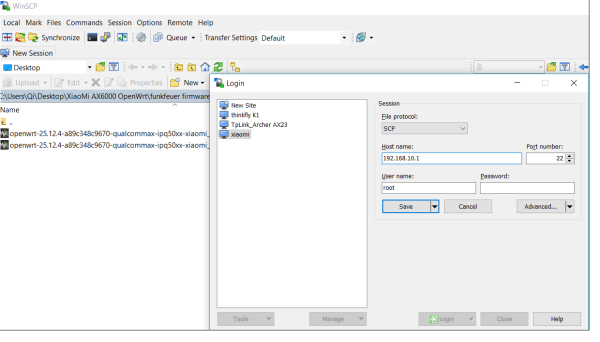
- enter the folder /etc/config/
- edit the file 'olsrd', replace the content with the following text
config olsrd

config LoadPlugin
	option library 'olsrd_arprefresh.so.0.1'

config LoadPlugin
	option library 'olsrd_dyn_gw.so.0.5'

config LoadPlugin
	option library 'olsrd_httpinfo.so.0.1'
	option port '1978'
	list Net '0.0.0.0 0.0.0.0'

config LoadPlugin
	option library 'olsrd_nameservice.so.0.4'

config LoadPlugin
	option library 'olsrd_jsoninfo'
	option accept '0.0.0.0'
	option ignore '0'

config procd 'procd'
	option respawn_threshold '3600'
	option respawn_timeout '15'
	option respawn_retry '0'

config InterfaceDefaults
	option Mode 'ether'
	option Ip4Broadcast '255.255.255.255'

config Interface
	option ignore '0'
	option interface 'ffste87 [!!! *************** replace this to your network name!!! *****************]'

config Hna4
	option netaddr '10.12.!!!**************xxx use your ip*******************!!!.144'
	option netmask '255.255.255.252'
- Go back to the router web interface
http://192.168.10.1/cgi-bin/luci/admin- 'Services → OLSR IPv4 → Interface', now you shall have this additional interface named 'ffste87'
Setup WiFi
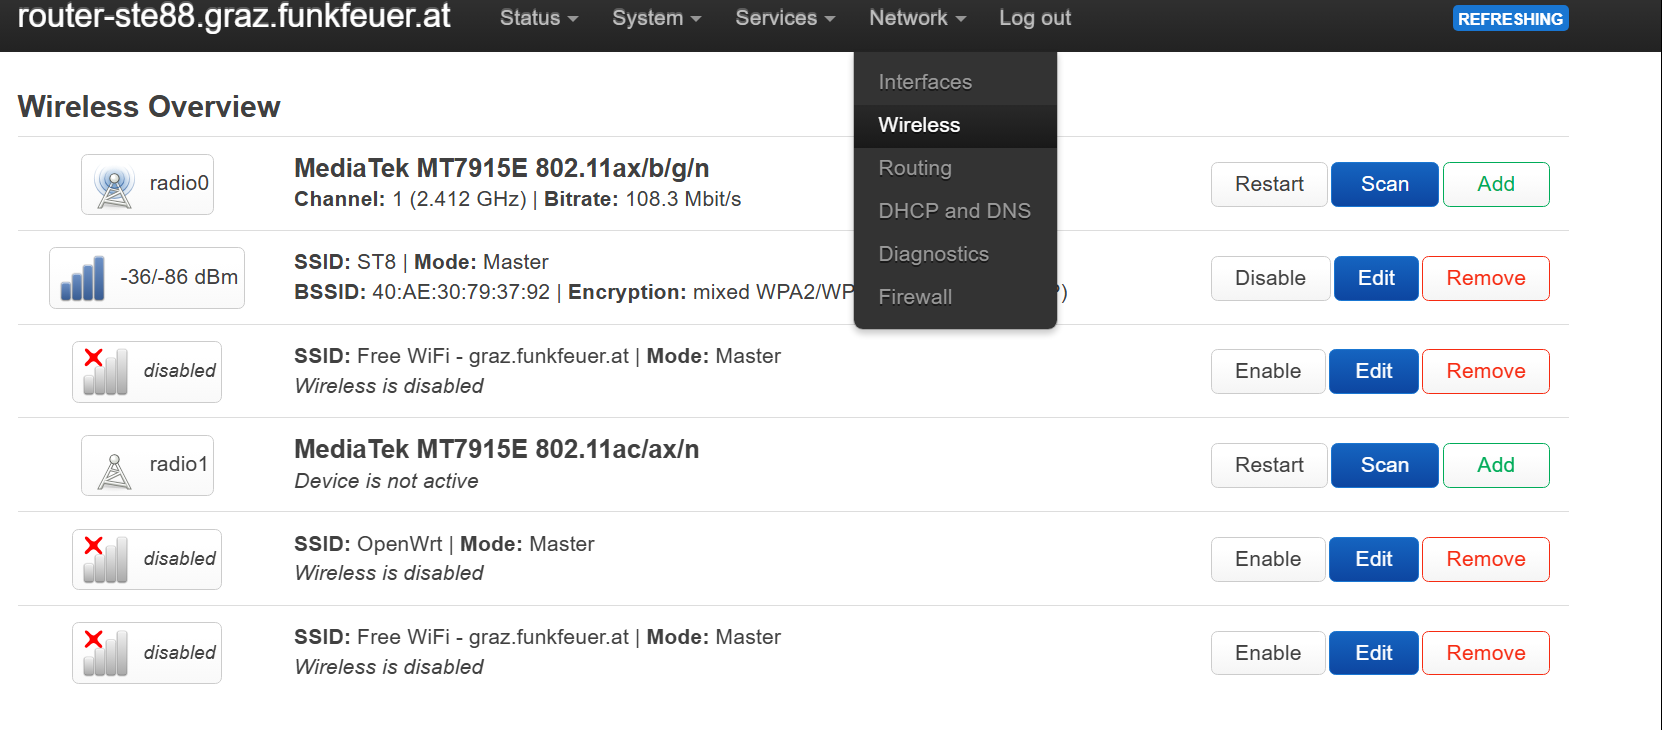
- Go to 'Network → Wireless'
- In this example, the WiFi was set to 'SSID: ST8'

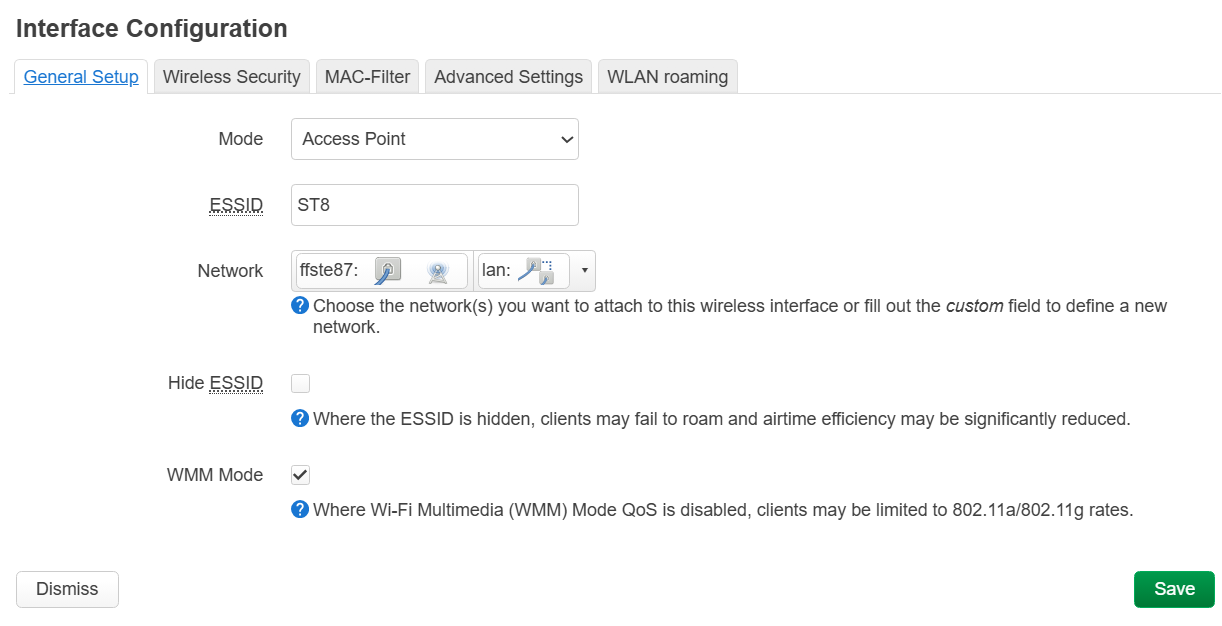
- Click 'Edit → Interface Configuration → General Setup'
- ESSID: any name for your WiFi, here it is 'ST8'
- Network: use the network you set before, here it is 'ffste87'
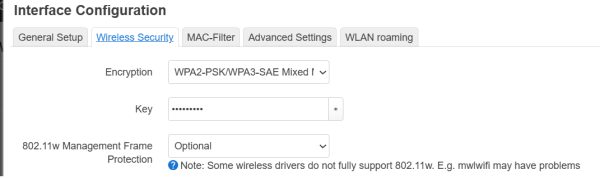
- To set the password of the wifi, click 'Interface Configuration → Wireless Security'
- Encryption: anyone you like
- Key: this is your wifi password
- Click 'Save & Apply'
- Connect to the WiFi with your mobile device, it should work now.